Introduction
As developers, we love working with Git, a version control system that keeps our code tracked and makes sure we don’t forget to commit our changes.
But there’s a bit of a problem with Git. When we work with multiple developers, we often have to merge our changes, and that’s where merge conflicts come in. If a conflict happens because of our code, we make the change again. But in some cases, the conflict is caused by nothing more than a different code style (single quotes vs double quotes, for example). Isn’t that a bit awkward?
Git Hooks
Like many other version control systems, Git has a way to fire off custom scripts when certain important actions occur. There are two groups of these hooks: client-side and server-side.
Client-side hooks are triggered by operations such as committing and merging, while server-side hooks run on network operations such as receiving pushed commits. You can use these hooks for all sorts of reasons.
Let’s say I have a project with two people on it, and we build features on different branches. When I commit, there’s actually a type error in the code, and I have no idea why. So the solution is to run a linter before I commit my changes, so I can fix the error before the commit is made.
But doing it manually would be a pain. I want a tool that does it for me, so a script runs the linter before every commit is made.
Husky
What is Husky, opens in a new tab? Here’s how it describes itself:
Husky improves your commits and more 🐶 woof!
As I said about Git hooks earlier, we can use them to run custom scripts before certain actions occur. Husky makes these hooks much easier to use, and it’s a good way to make your life easier.
Features
Husky offers these features to help you:
- Zero dependencies and lightweight (
6 kB) - Powered by modern new Git feature (
core.hooksPath) - Follows npm, opens in a new tab and yarn, opens in a new tab best practices regarding auto install
- User-friendly messages
- Optional install
- Like husky 4, supports
- macOS, Linux and Windows
- Git GUIs
- Custom directories
- Monorepos
Lint Staged
Lint Staged, opens in a new tab runs linters against staged git files and doesn’t let 💩 slip into your code base! For example, when you run this command, these scripts run:
Terminal
$ git commit

✔ Preparing lint-staged...
❯ Running tasks for staged files...
  ❯ packages/frontend/.lintstagedrc.json — 1 file
    ↓ *.js — no files [SKIPPED]
    ❯ *.{json,md} — 1 file
      ⠹ prettier --write
  ↓ packages/backend/.lintstagedrc.json — 2 files
    ❯ *.js — 2 files
      ⠼ eslint --fix
    ↓ *.{json,md} — no files [SKIPPED]
◼ Applying modifications from tasks...
◼ Cleaning up temporary files...
Linting makes more sense when run before committing your code. By doing so you can ensure no errors go into the repository and enforce code style. But running a lint process on a whole project is slow, and linting results can be irrelevant. Ultimately you only want to lint files that will be committed.
Conventional Commit With Commitizen
Collaborating with other developers is quite fun, but when you work with a team, you need to make sure your code is clean and that you follow your team’s rules. Some teams are stricter than others, so you need to make sure your commit messages are clear and easy to understand.
That’s why we use Commitizen, opens in a new tab: it makes sure your commit messages have clear context and are easy for other developers to understand.
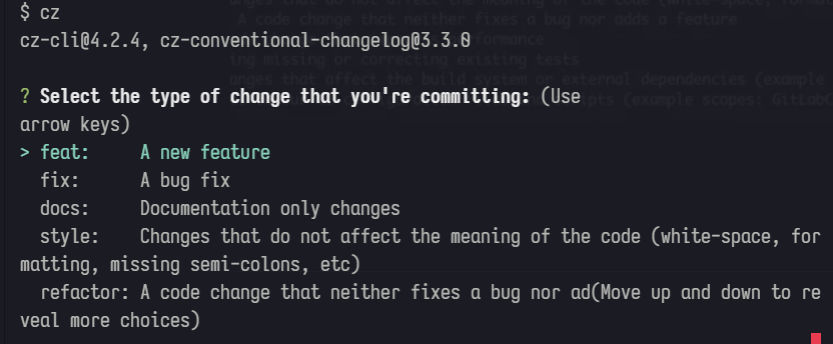
Commitizen is very helpful when you want to make a commit. Instead of writing the message from scratch, it prompts you to write it based on your team’s rules and on context, such as feat, fix, and chore.
Here’s what it looks like when you run cz instead of git commit. It shows a prompt to help you choose your commit message:
Tip: click the image to see it more clearly
Set Up Next.js
Before we use any tools, we need to create a new Next.js project. Run the following command in your terminal:
Terminal
yarn create next-app my-appIt spins up a new Next.js project. As usual, you get a default template, and you can start editing your code there. This article won’t cover how to edit your code, though, so let’s skip that part and start using the tools we want.
Set Up ESLint And Prettier
Before we continue, the method I’m explaining also uses two essential tools: eslint, opens in a new tab and prettier, opens in a new tab.
So let’s set up those tools. We’re going to install prettier and eslint, then add their config files to our project. Run the following command in your terminal to install prettier and eslint:
Terminal
yarn add prettier -D && npx eslint --initThe command above installs prettier as a devDependency and then initializes eslint for your project. You’ll be asked a few questions, depending on your project. If you’re using TypeScript, choose typescript react. Otherwise, choose javascript react.
ESLint installs its dependencies for you and then creates a config file. If it’s a .json file, consider renaming it to a .js file and updating the code to match the .js format instead of .json.
Next, create a file named .prettierrc.js at the root of your project, and paste the following config inside it:
.prettierrc.js
const config = {
  semi: false,
  tabWidth: 2,
  printWidth: 120,
  singleQuote: true,
  jsxSingleQuote: true,
  trailingComma: "none",
  arrowParens: "always",
  endOfLine: "auto",
};

module.exports = config;
If you’re familiar with Prettier, feel free to change the config to match your own preferences.
Set Up Husky
Next, let’s install Husky to manage our Git hooks by running the following command in the terminal:
Terminal
yarn add husky -DAfter the installation completes, run this command to set up husky:
Terminal
husky installIt creates a new /.husky folder at the root of your project. Open it and create a new file called pre-commit inside the /.husky directory. The structure will look like this:
Terminal
/.husky
/pre-commit
|- /_
|-|
  |- /.gitignore
  |- /husky.sh
Inside pre-commit file, paste this code:
.husky/pre-commit
#!/bin/sh
. "$(dirname "$0")/_/husky.sh"
echo '🏗️👷 Styling your project before committing👷♂️🏗️'
echo 'please be patient, this may take a while...'
# Check ESLint Standards
yarn lint ||
(
echo '🔨❌ Yoo, you have a problem in your code. Check linter 🔨❌
Run yarn lint, add changes and try commit again.';
false;
)
echo '🎉 No error found: committing this now.... ✨🚀🏄♂️🍻'
npx lint-stagedThe code above runs in your terminal right before Git makes the commit. First, it prints out two lines, and then it runs the yarn lint command. If the command fails, it prints out 🔨❌ Yoo, you have… and immediately cancels the rest of the script, because we run false.
If linting succeeds and no errors are found, it prints out the message and then runs the npx lint-staged script, which formats our code with prettier.
Add a new script to your package.json file, so husky is set up every time someone installs the project’s dependencies.
./package.json
{
  "name": "app name",
  "version": "0.0.0",
  "scripts": {
    "postinstall": "husky install"
  },
  "dependencies": {},
  "devDependencies": {}
}
Set Up Lint Staged
Next, we need to install and set up Lint Staged so we can lint before each commit. It’s very easy to do. Just run the following command in the terminal to install lint staged:
Terminal
yarn add lint-staged -DAfter the installation, let’s create the configuration for lint-staged. Lint staged gives you several ways to configure it:
lint-stagedobject in yourpackage.json.lintstagedrcfile in JSON or YML format, or you can be explicit with the file extension:.lintstagedrc.json.lintstagedrc.yaml.lintstagedrc.yml
In this article, I’ll show you the lint-staged object in package.json, so let’s start with that:
./package.json
{
  "name": "app name",
  "version": "0.0.0",
  "scripts": {
    "postinstall": "husky install"
  },
  "dependencies": {},
  "devDependencies": {},
  "lint-staged": {
    "**/*.{js,jsx,ts,tsx}": [
      "eslint --fix",
      "prettier --config ./.prettierrc.js --write"
    ],
    "**/*.{css,scss,md,html,json}": [
      "prettier --config ./.prettierrc.js --write"
    ]
  }
}
Set Up Commitizen
Commitizen helps organize commit messages, which is useful when I make changes to my code and want to keep track of what I did.
The easiest way to set up Commitizen is with its CLI. The first step is to make your repo Commitizen friendly, so let’s install the commitizen CLI tools. You can install it globally or locally, but I prefer installing it globally. Type the following command in the terminal:
Terminal
yarn global add commitizenIf you’re using npm, you can install it by typing the following command:
Terminal
npm install commitizen -gNext, initialize your project to use the cz-conventional-changelog adapter by typing:
Terminal
commitizen init cz-conventional-changelog --save-dev --save-exactOr if you are using Yarn:
Terminal
commitizen init cz-conventional-changelog --yarn --dev --exactThe above command does three things for you:
- Installs the
cz-conventional-changelog adapter - Saves it to
package.json’s dependencies or devDependencies - Adds the
config.commitizenkey to the root of your package.json file as shown here:
./package.json
{
  "name": "app name",
  "version": "0.0.0",
  "scripts": {
    "postinstall": "husky install"
  },
  "dependencies": {},
  "devDependencies": {},
  "lint-staged": {
    "**/*.{js,jsx,ts,tsx}": [
      "eslint --fix",
      "prettier --config ./.prettierrc.js --write"
    ],
    "**/*.{css,scss,md,html,json}": [
      "prettier --config ./.prettierrc.js --write"
    ]
  },
  "config": {
    "commitizen": {
      "path": "cz-conventional-changelog"
    }
  }
}
Now we’re ready to use the cz command to make a commit, and it will prompt you to choose your commit message!
Summary
We made it to the end. Let’s summarize what we did:
-
Husky
It helps us set up Git hooks more easily.
-
Lint Staged
It helps us run certain tasks before committing our code, and it makes sure our code is clean and well formatted.
-
Commitizen
It helps us organize our commit messages and makes sure they’re clear and easy to understand.
So that’s all, folks! I hope this article helps you get started. See you next time!